
Range Names in Excel
Content
- Introduction
- Video
- How To Define Range Names
- How To Use Range Names
- Absolute And Relative Addressing
- The Context Of Names
- Special Names
- A Step Further: A Formula In A Defined Name
- Dynamic Names
- Another Step Further: XL4 Macro Functions In Names
- Passing an argument to a named formula
- Bugs in Excel's Name Object
- Other issues with defined names
- Conclusion
- Name Manager
- Links
Introduction
Range names are an important feature of Excel. This article demonstrates many aspects of range names.
Excel allows you to name a range of cells. When you do that, you can use this name in your formulas, instead of the address. In general it is easier to remember a name than the address of a range of cells.
Using names has a couple of advantages: ranges are easier to find, formulas are simpler to understand and maintenance of the spreadsheet model becomes more reliable.
Furthermore, some things in Excel can only be achieved by using defined names. But much more is possible with defined names than just naming a range of cells. Because you can also put a formula into a name, a whole world of possibilities opens up!
Even more so, you can put the old Excel 4 macro functions to use in a defined name. This enables you to do things normally only possible using VBA.
Video
I presented about range names at the Excel Virtually Global conference on October 8, 2024. Here is a link to the recording:

How To Define Range Names
There is a number of ways to name a range of cells.
The first one is by using the Name box to the immediate left of the formula
bar:
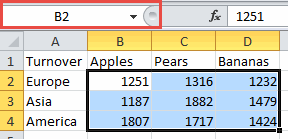
When the currently selected range is already named, the name box will show its name. Otherwise you'll see the address of the active cell in this box. Select the range you want to name and then click in the Name box and type the name. Press Enter to confirm.
There is one drawback to this method. When the name you typed already exists, Excel will not apply the name to the selection. Instead Excel will select the range belonging to the existing definition of the name you typed.
So the Name box can also be used to navigate to an existing name. Just select a name from the dropdown list or type the name in the box and hit enter.
When the headings of a table already represent the names you would like to assign to its rows and/or columns you can use a really fast method to apply those names to the ranges. See the screen shot below:
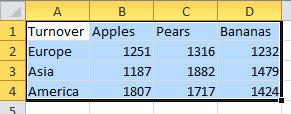
Select the both the table content and its headers. Then click the Formulas tab and click "Create from Selection".
You'll see this dialog popup:
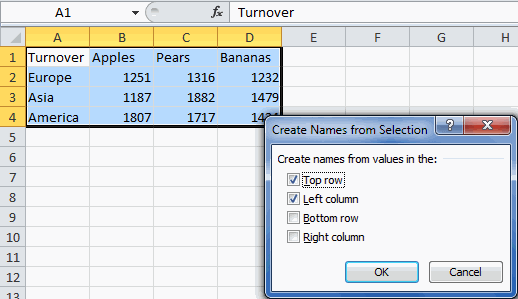
By selecting the options shown in that screenshot, seven names are defined in one go:
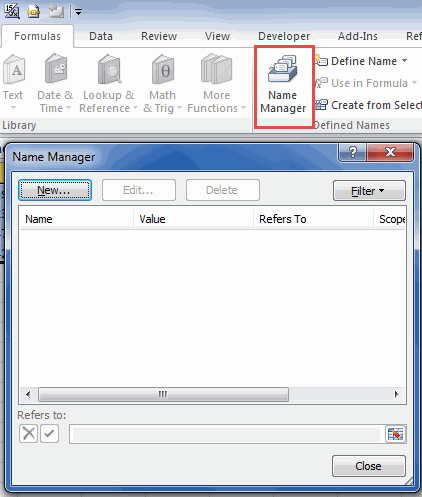
The third way to define a name is by clicking the Define name button to the right of that Name Manager button on the Formulas tab (keyboard short-cut: Control + Alt + F3). You can also click the "New" button in the Name Manager dialog:
How To Use Range Names
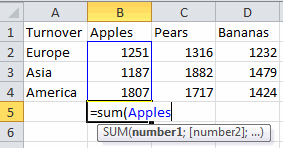
Using the table I showed earlier, I'll demonstrate some options with names. To calculate the total of Apples sold, one would normally use this formula: =SUM(B2:B4). After defining names you can simply type: =SUM(Apples). It is evident this is easier to understand.
Another interesting thing is that names are always arrays. If you enter =Apples in a cell, you get:
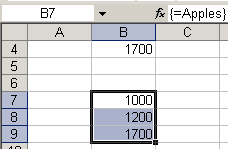
you will get the values of the three cells Apples refers to.
But there is more. When you would like to know the apples sold in Europe (1000) you can type:
=Apples Europe
By separating the two names with a space (also called the intersect operator) Excel gives you the intersection of these two named ranges. Since in this case this is a single cell, the formula returns a single number.
Names can be used in all areas of Excel that accept a range of cells as an argument. In some cases this is the only way to have that feature work reliably.
One example is Data Validation using the List option. If the list is in a table on a separate worksheet, the list will not automatically grow when the table grows. Defining a name that spans the column of the table that the data validation is using (and pointing the data validation list to that name) will fix that.
Absolute And Relative Addressing
When you define a name, Excel defaults to using absolute cell references: Sheet1!$A$1. The dollar signs indicate that the address should be interpreted absolutely, independent of the cell that calls the name.
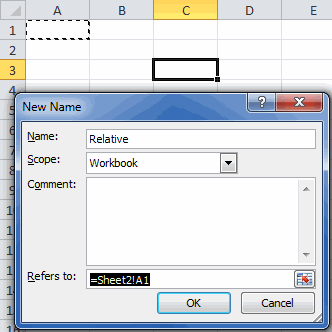
You can also use relative references however, giving you interesting possibilities (though I would not recommend using this technique because it makes yor spreadsheet hard to understand).
If for example you select cell C3 on Sheet2 and define a name as =Sheet2!A1, this name will point to a cell two columns to the left and two rows up from the cell the name is used in.
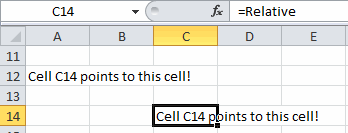
Enter the formula =Relative in cell C14 on Sheet2 and it will point to cell A12, two columns to the left and two rows up of cell C14:
The Context Of Names
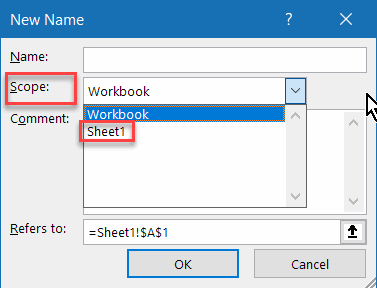
When you define a range name using the methods described so far, you will always get a defined name which is visible throughout an entire workbook.
In general this kind of name is referred to as a workbook name or a global name. The workbook is their parent object. Names can also be defined local to a worksheet. By using the Scope drop-down, you can create a local name:
If a name has both a global and a local version, problems may arise.
On a worksheet with a local name it is not possible to use the global name, Excel will always use the local name. On other worksheets, Excel will default to the global name, unless you precede it with the worksheet name:
=Sheet3!LocalName
When one creates a copy of a worksheet to which one or more global names refer, Excel will automatically create copies of those names local to the copied worksheet. Here is a screen shot of Name Manager showing the result of copying Sheet1:
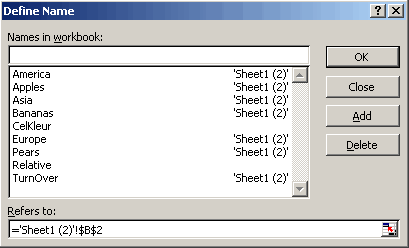
Note, that the each name has acquired a local copy which has 'Sheet1 (2)' as its scope.
Special Names
Excel also uses defined names for built-in functionality. The table below lists a few:
It is not a good idea to edit or delete these names, unless you know exactly what you are doing. It is better to let Excel handle those names.
A Step Further: A Formula In A Defined Name
Up until now, the names in this article referred to ranges of cells. In reality, a defined name in fact just holds a formula (like in a cell!) and you can use any of Excel's extensive list of worksheet functions in names. This opens up a world of possibilities!
Have a look at the screen shot below. Here a name called ColumnSum has been defined, using cell B5 as the anchor cell. The principle of using relative references has been used here as well, as shown in a previous section. The formula for ColumnSum is:
=SUM(B$2:B4)
Or the sum of all cells as from row 2 down to the row immediately above the cell in which the name has been applied to, restricted to the same column as the name is used in.
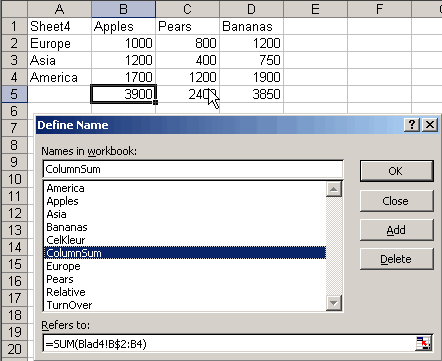
So when you enter =ColumnSum into cell B5, in reality Excel will compute
=SUM(B2:B4) for you:

Similarly, when entered into cell D20, Excel calculates =SUM(D17:D19).
But as I wrote earlier: I do not recommend using this technique as it
makes your spreadsheet very hard to understand.
Dynamic Names
Although dynamic names can be useful, it is better to convert your range to a table and use table referencing. Tables are dynamic by design.
Oftentimes you need to calculate (sub)totals of ranges to which data is to be added at a later stage. It would be nice however if you wouldn't need to adjust references in formulas every time data is added to the file, it is more practical to let Excel do this kind of housekeeping for you.
By using the OFFSET worksheet function the exact range containing data can be made dynamic. The OFFSET function has these arguments:
=OFFSET(StartingAddress,RowsDown,ColumnsToRight,NuberOfRows,NumberOfColumns)
Suppose you have a table like this:
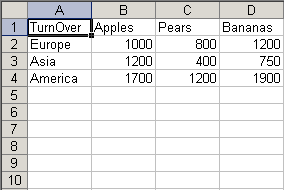
and you want a range that refers to the apples column, adjusting itself for
the number of regions filled in in column A.
Using cell B2 as the starting address, you would need to go down 0 rows and go 0 rows to the right. Then count the number of rows in column A (for this you can use the COUNTA function, which counts all filled cells in its range argument) and finally, ask it to return a single column. The end result should look like this:
=OFFSET(Sheet5!$B$2,0,0,COUNTA(Sheet5!$A:$A)-1;1)
Because you don't want to include the row headings in the count, 1 is subtracted from the COUNTA result.
This formula has been defined as ApplesDynamic:

Because column A has been used to count the number of rows that are filled, the actual range this new dynamic name refers to will always be determined by how many cells in column A actually contain information. Because of this, you cannot enter any information in cells further down below the current table, or leave rows empty inside the table: The dynamic range will be off by the number of empty cells or by the number of extra used cells below the table. One of the reasons I recommend using Formatted Tables instead of this method.
When you now enter a new row to the data (like Australia in cell A5), the name ApplesDynamic will automatically refer to the range B2:B5. So when a sales amount for Australian Apples is entered, it will automatically be used in any formulas that use ApplesDynamic. To ensure the ranges next to the ApplesDynamic range are dynamic as well you can again apply the OFFSET function. This time it will be derived as an offset from the ApplesDynamic range: PearsDynamic will be defined as:
=OFFSET(ApplesDynamic,0,1)
In other words: PearsDynamic is simply ApplesDynamic, but shifted one column to the right.
Finally, you can make the data area of the entire table dynamic as well, so addition of fruits is accounted for automatically:
"TurnOverDynamic".
=OFFSET(Sheet5!$B$2,0,0,COUNTA(Sheet5!$B:$B)-1, COUNTA(Sheet5!$1:$1)-1)
As you can see, both the number of rows and the number of columns are here determined using the COUNTA function.
Whether or not these names have been defined properly is easy to check. Hit F5 (Goto) and type a name into the Reference textbox and hit OK. Excel will select the computed area the name currently refers to.
A practical example of using dynamic names in combination with a chart is shown in autochrt.zip.
Another Step Further: XL4 Macro Functions In Names
It is not widely known that one can use XLM (no, not XML!) macro functions (these go way back to Excel version 4) in defined names. This enables you to do things you normally can only do using VBA.
One important warning has to be made though. When you copy a cell that uses any name containing XLM macro functions to another worksheet, Excel 97 and Excel 2000 will crash! Copying the formula itself from the formula bar (by selecting the formula and hitting control-c) will be no problem however.
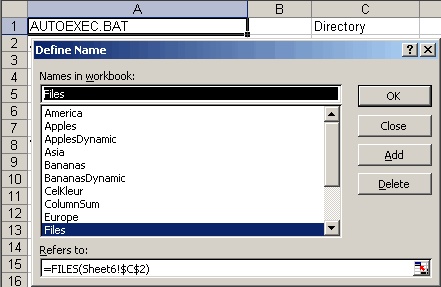
Example 1: Creating A List Of Files In A Worksheet.
You can do this by using the XL4 FILES macro function, applied in a name called "Files":
=FILES(Sheet6!$C$2).
On Sheet6 in cell C2 you can enter a path and filename (including wildcards) like "c:\*.*". In any column, starting on row 1 the following formula will show the files found in that folder:
=INDEX(Files,ROW())
Copy this cell downwards until the formula returns #REF!. You can now easily update this list to show another folder by simply typing the folder name into cell C2.
Example 2: Reading the interior color of a cell.
Note that these XLM functions are very old. the returned information in the example below is the so-called ColorIndex. In pre-2007 Excel, only 56 colors were available to you. We can still use the colorIndex in both the example below and in VBA, but if the current color of a cell does not match one of those 56 colors, Excel will use an unknown algorithm to return the closest match. This means different shades of a color may return the exact same ColorIndex number.
With the function GET.CELL you can retrieve all kinds of information about a cell, amongst others the color index of the interior (fill color) of the cell. To achieve this, define this name (after selecting cell B2 on Sheet7): Name: CellColor, RefersTo:
=GET.CELL(63,Sheet7!A2)+NOW()*0
The addition of NOW()*0 ensures that the name is recalculated every time Excel recalculates. The argument 63 tells the GET.CELL function you want the interior color:
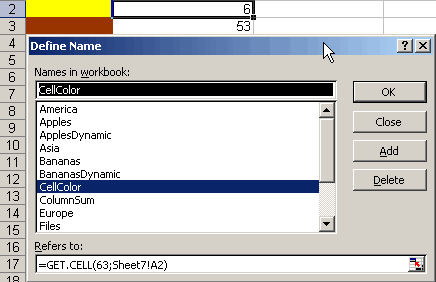
Note that you can use a relative reference so the name will refer to a cell relative to the cell it is used in. In this example, the name points to the cell to the immediate left of the cell you will use the name in. Because changing the color of a cells interior will not fire a recalculation, changing formatting will not automatically change the formula results in this example.
Using this new name enables one to e.g. sum all blue colored cells in a range:
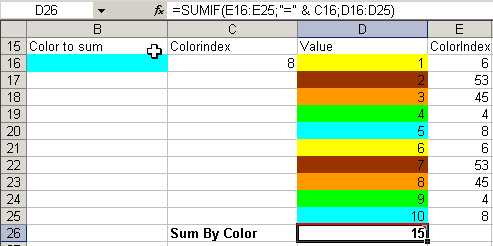
In this example, the ranges C16 and E16:E25 contain the formula =CellColor. Cell D26 contains the formula: =SUMIF(E16:E25,"=" & C16,D16:D25).
I'm not a fan of using this technique. If you want to categorize numbers, I advise not to use coloring to do calculations. Instead, add a category column so you can simply use functions like SUMIFS.
Example 3: Adding just the displayed digits.
When you have set a particular number format to a cell to show e.g. just 2 decimals after the dot, rounding "mistakes" may show up in your spreadsheet. This is caused by the fact that Excel uses all digits of the number in its cells to do the math and not just the digits shown to you. The GET.CELL function can extract the value shown in the cell (create this name whilst in cell C2):
Name: NumberInCell RefersTo: =GET.CELL(53,Sheet8!A2)+NOW()*0
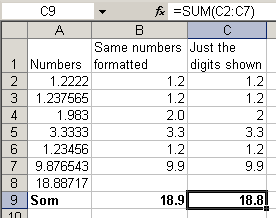
You can clearly see that the result in cell C9 differs from the result in B9. Of course you could also use the ROUND worksheet function to achieve a similar result, but the advantage of this method is that when you change the number formats of the cells to be summed, the result will reflect that (after a recalc of course).
Example 4: Referring to the previous and next worksheet.
Sometimes it is useful to have a way to have a formula point to the sheet to the immediate left, regardless what sheet is moved or inserted there. When this formula is copied from Sheet2 to Sheet3, the copy will refer to Sheet2 instead of to Sheet1 (normally the sheet reference does not change when copying a formula to another sheet). You need a combination of a couple of names to achieve this. First define a name called "AllSheets", referring to:
=GET.WORKBOOK(1+0*NOW())
The result of this name will be (in a workbook named Names02EN.XLS containing Sheet1, Sheet2 and Sheet3):
{[Names02.XLS]Sheet1,[Names02.XLS]Sheet2,[Names02.XLS]Sheet3}
The name of the current worksheet can be extracted using this formula in the defined name called "ThisSheet":
=GET.CELL(32+0*NOW(),INDIRECT(GetRC,FALSE))
The formula INDIRECT(GetRC,FALSE) extracts the cell from which the name has been used. The GetRC name determines what letters Excel is using to determine rows and columns (to make this formula work in any language version of Excel):
Name: GetRC
RefersTo: =SUBSTITUTE(REFTEXT(!$A$1),1,"")
GET.CELL(32,..) yields the name of the worksheet that contains the cell you extracted using the INDIRECT clause shown above, preceded by the filename. On Sheet2 the result of this formula will be: [Names02.XLS]Sheet2
By using the following formula in the name called "PreviousSheet"), you can extract the name of the sheet to the immediate left of the current worksheet:
=INDEX(AllSheets,MATCH(ThisSheet,AllSheets,0)-1)
The Match function gets the index of the current worksheet. By subtracting 1 you will have the index of the sheet to the immediate left of the current sheet. Finally, the INDEX function gives you the actual name of the sheet (again, preceded with the filename). Similarly you can extract the name of the next worksheet (name: "NextSheet"):
=INDEX(AllSheets,MATCH(ThisSheet,AllSheets,0)+1)
Finally the following formula will get you the value of cell B2 on the previous worksheet:
=INDIRECT("'"&PreviousSheet&"'!"&CELL("address",B2))
And ditto for the next worksheet:
=INDIRECT("'"&NextSheet&"'!"&CELL("address",B2))
The file Arg2Name.zip on the download page gives some examples of the use of XL4 macro functions in names.
If you want to learn what else you can do with these macro functions, download the old help files for here (in PDF format) courtesy MyOnlineTrainingHub.
Passing an argument to a named formula
Note that this chapter is now obsoleted by the new LAMBDA function of Excel.
As shown in the file Arg2Name.zip (see the download page), there is a trick to pass arguments to a defined name formula.
First the named formula called Myref (see below) has to be created, which evaluates the string of the formula of the "active" cell (the cell that calls one of the other named formulas in this example) and extracts an address out of that. In order to use these formulas, a trick is involved. The function that contains the address should look like this:
=IF(ROW(ref),NameOfTheDefinedFormula)
The Myref function finds the "Row(" part in the string of the formula and takes all text between that and the first closing parenthesis to be a valid cell reference. Myref in part is used as an argument to the other functions.
Define Myref as:
=MID(GET.CELL(6,INDIRECT(GetRC,FALSE)),FIND("ROW(",GET.CELL(6, INDIRECT(GetRC,FALSE)))+4,FIND(")",GET.CELL(6,INDIRECT(GetRC,FALSE)))-FIND("ROW(",GET.CELL(6,INDIRECT(GetRC,FALSE)))-4)
Note, that Myref has used the GetRC name demonstrated above.
Here are some examples that may be used in combination with the Myref named formula. Define these names:
IsFormula =GET.CELL(48,INDIRECT(myref)))+0*now()
CellColor =get.cell(63,indirect(MyRef))+0*now()
RowIsHidden =IF(GET.CELL(17,INDIRECT(Myref))=0,TRUE,FALSE)+0*now()
RowHeight =GET.CELL(17,INDIRECT(Myref))+0*NOW()
An example how to use these functions in worksheet cells:
=IF(ROW(D3),CellColor)
Shows the colournumber of the background of cell D3.
=IF(ROW(D3),RowHeight)
Shows the rowheight of cell D3 (in effect of row D).
Bugs in Excel's Name Object
During development of the Name Manager, a number of bugs in Excel's defined name object have been revealed.
From the Name Manager's Manual:
There are some bugs in Excel’s Names collection and Name Object:
RefersToLocal
The RefersToLocal property of a name will not accept formula strings in Excel's UI language. For instance, in a Dutch Excel this code line:
Names("Test").RefersToLocal="=SOM($A$1;$B$1)"
Gives a runtime error, even if the formula is completely correct and identical to a worksheet formula. In the Name Manager a workaround has been used to overcome this problem. The RefersToLocal property ONLY accepts US syntax for formulas and separators.
Showing The "Define Name" Dialog Through VBA Code
When one has an Excel version that is NOT English and one shows the Insert Name dialog from Code, using either:
Application.Dialogs(xlDialogDefineName).Show
or
Application.CommandBars(1).FindControl(ID:=878, recursive:=True).Execute
It always seems to show the dialog with the cell reference in R1C1 (of course Excel is set to A1)!
Names Local To Sheets With Special Characters In Their Name
When one defines a local name on a Sheet named "Test":
Name: Test!test
Refersto: "1"
and renames this sheet to e.g. "Hi! There!" (without the quotes), this name becomes inaccessible for editing and deleting, yielding an invalid name error message. Other strange characters in sheet names (especially "[", "]" and char(3) ) may even cause a crash of Excel when trying to access these local sheet names. A check has been included in the Name Manager to overcome this problem.
Global And Local Names Sharing The Same Name
Accessing a global name whilst the active sheet has an identically named name local to that sheet, will change the properties of the local name and NOT the global name, even if the name is fully qualified with the workbook name. Name Manager bypasses this problem.
Names Who's RefersTo Property Starts With =!
Names with refers-to starting with =! (for example =!$A$1) may give incorrect results when calculation is called from VBA. Such names should (with this example) give you the result of the cell A1 on the sheet the name is used in, but when a recalc is forced through a macro, the name will get the result from the cell on the active sheet! Name Manager will show a warning message whenever it finds a name of this type. If you want to have a name that will refer to a fixed cell on whatever sheet the name is used on, use =INDIRECT("A1") in stead of =!$A$1 to avoid this Excel bug.
Other issues with defined names
Auditing problems
Using defined names to make your formulas easier to read has disadvantages too. Because normal cell references have been replaced with names, a spreadsheet may become harder to audit. Especially if hundreds of names have been applied, without any obvious naming convention, auditing such workbooks may become a daunting task.
Copying sheets can create links in names
When one copies a worksheet from one workbook to another, defined names may travel with the copy. All names that refer to the copied sheet directly are copied to the other workbook. But also all defined names used on the copied sheet are copied to the new workbook, but they keep referencing the original file. Thus, a link between the two books is created behind the scenes and mostly without the user realizing this has happened.
As long as one caters for these issues, defined names are an important part of any spreadsheet model and can improve the maintainability of the model too.
Conclusion
This article is focused on giving insight in the power of range names in Excel. Starting off with simply naming a range of cells, continued with the powerful option to put a formula in a name and topped off with showing how to put XLM macro functions to use in defined names, enabling you to do things you can normally only achieve using VBA.
By making proper use of defined names, you can build powerful and easy to maintain Excel solutions.
Name Manager
Creating and editing Range Names in Excel is much easier if you start using the Name Manager!
Links
There are various sites that have extensive information about Excel's capability to define a name that refers to a range of cells or a formula. An instructive one is:
Chip Pearson (English)
Frequently asked Questions
What are the advantages of using range names in Excel?
How can you define range names in Excel?
How do you use range names in formulas?
What is the difference between absolute and relative addressing in range names?
What is the scope of range names and how does it affect their use?
What are special names in Excel and why should you be careful with them?
How can you create dynamic range names that adjust to data changes?
What are XL4 macro functions in defined names and what can they do?
Comments