 Back to jkp-ads.com |
Ron de Bruin
|
|
|
Back to jkp-ads.com |
Ron de Bruin
|
|
Ron de Bruin decided to remove all Windows Excel content from his website for personal reasons. If you want to know why, head over to rondebruin.nl.
Luckily, Ron was kind enough to allow me to publish all of his Excel content here.
Most of these pages are slightly outdated and may contain links that don 't work. Please inform me if you find such an error and I'll try to fix it.
Kind regards
Jan Karel Pieterse
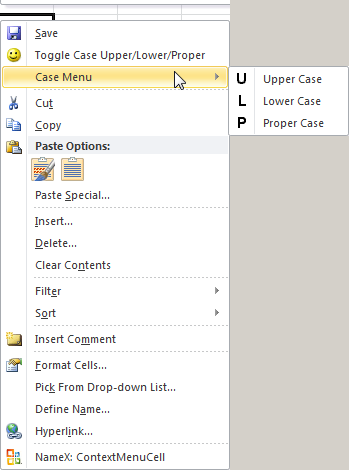
The most common Context Menu that most people know and use is the Cell
menu.
This is the menu that you see when you right click on a worksheet
cell or selection.
The screenshot below is from the Excel 2010 Cell
menu.
Note: On the bottom of the menu you also see the
name of the idMso of this
menu added by the Microsoft add-in discussed
later in this article.
The only way to change this menu up to Excel 2007 is to use VBA code, but
in Excel 2010 and up
you can also change a context menu with RibbonX. Visit
this page for RibbonX examples :
Customizing Context Menus in Microsoft Excel 2010-2016 with RibbonX
This example will add a custom button, built-in button (Save) and a
Custom menu on top of the Cell menu. Other context menus that you can change
are the Row and Column context menus for example.These are the menus that
you see when you right click on the row or column headers. See the Tips
section for a tip how to find the names of the other context menus.
Note: There are two Cell menu's in Excel, the second one
you see when you are in page break preview mode. If you want to change this
menu use this then in the code.
Set ContextMenu =
Application.CommandBars(Application.CommandBars("Cell").Index + 3)
The same applies to the Row and Column context menus.
Copy the six
macro's below into a General module of your workbook.
If you do not
know where to copy the code check out this page.
Where do I paste
the code that I find on the internet
The first macro adds the
controls to the Cell menu (see how I add a Tag to the controls I add).
The second macro deletes the controls from the Cell menu (See how I use the
Tag to delete the controls).
The other four macros will run when you
click on the Button or on one of the three options in the menu.
As a
example I use macro's that change the Case of the text cells in the
selection.
Sub AddToCellMenu()
    Dim ContextMenu As CommandBar
    Dim MySubMenu As CommandBarControl

    'Delete the controls first to avoid duplicates
    Call DeleteFromCellMenu

    'Set ContextMenu to the Cell menu
    Set ContextMenu = Application.CommandBars("Cell")

    'Add one built-in button(Save = 3)to the cell menu
    ContextMenu.Controls.Add Type:=msoControlButton, ID:=3, before:=1

    'Add one custom button to the Cell menu
    With ContextMenu.Controls.Add(Type:=msoControlButton, before:=2)
        .OnAction = "'" & ThisWorkbook.Name & "'!" & "ToggleCaseMacro"
        .FaceId = 59
        .Caption = "Toggle Case Upper/Lower/Proper"
        .Tag = "My_Cell_Control_Tag"
    End With


    'Add custom menu with three buttons
    Set MySubMenu = ContextMenu.Controls.Add(Type:=msoControlPopup, before:=3)

    With MySubMenu
        .Caption = "Case Menu"
        .Tag = "My_Cell_Control_Tag"

        With .Controls.Add(Type:=msoControlButton)
            .OnAction = "'" & ThisWorkbook.Name & "'!" & "UpperMacro"
            .FaceId = 100
            .Caption = "Upper Case"
        End With
        With .Controls.Add(Type:=msoControlButton)
            .OnAction = "'" & ThisWorkbook.Name & "'!" & "LowerMacro"
            .FaceId = 91
            .Caption = "Lower Case"
        End With
        With .Controls.Add(Type:=msoControlButton)
            .OnAction = "'" & ThisWorkbook.Name & "'!" & "ProperMacro"
            .FaceId = 95
            .Caption = "Proper Case"
        End With

    End With

    'Add seperator to the Cell menu
    ContextMenu.Controls(4).BeginGroup = True
End Sub


Sub DeleteFromCellMenu()
    Dim ContextMenu As CommandBar
    Dim ctrl As CommandBarControl

    'Set ContextMenu to the Cell menu
    Set ContextMenu = Application.CommandBars("Cell")

    'Delete custom controls with the Tag : My_Cell_Control_Tag
    For Each ctrl In ContextMenu.Controls
        If ctrl.Tag = "My_Cell_Control_Tag" Then
            ctrl.Delete
        End If
    Next ctrl

    'Delete built-in Save button
    On Error Resume Next
    ContextMenu.FindControl(ID:=3).Delete
    On Error GoTo 0
End Sub


Sub ToggleCaseMacro()
    Dim CaseRange As Range
    Dim CalcMode As Long
    Dim cell As Range

    On Error Resume Next
    Set CaseRange = Intersect(Selection, _
        Selection.Cells.SpecialCells(xlCellTypeConstants, xlTextValues))
    On Error GoTo 0
    If CaseRange Is Nothing Then Exit Sub

    With Application
        CalcMode = .Calculation
        .Calculation = xlCalculationManual
        .ScreenUpdating = False
        .EnableEvents = False
    End With

    For Each cell In CaseRange.Cells
        Select Case cell.Value
        Case UCase(cell.Value): cell.Value = LCase(cell.Value)
        Case LCase(cell.Value): cell.Value = StrConv(cell.Value, vbProperCase)
        Case Else: cell.Value = UCase(cell.Value)
        End Select
    Next cell

    With Application
        .ScreenUpdating = True
        .EnableEvents = True
        .Calculation = CalcMode
    End With
End Sub


Sub UpperMacro()
    Dim CaseRange As Range
    Dim CalcMode As Long
    Dim cell As Range

    On Error Resume Next
    Set CaseRange = Intersect(Selection, _
        Selection.Cells.SpecialCells(xlCellTypeConstants, xlTextValues))
    On Error GoTo 0
    If CaseRange Is Nothing Then Exit Sub

    With Application
        CalcMode = .Calculation
        .Calculation = xlCalculationManual
        .ScreenUpdating = False
        .EnableEvents = False
    End With

    For Each cell In CaseRange.Cells
        cell.Value = UCase(cell.Value)
    Next cell

    With Application
        .ScreenUpdating = True
        .EnableEvents = True
        .Calculation = CalcMode
    End With
End Sub


Sub LowerMacro()
    Dim CaseRange As Range
    Dim CalcMode As Long
    Dim cell As Range

    On Error Resume Next
    Set CaseRange = Intersect(Selection, _
        Selection.Cells.SpecialCells(xlCellTypeConstants, xlTextValues))
    On Error GoTo 0
    If CaseRange Is Nothing Then Exit Sub

    With Application
        CalcMode = .Calculation
        .Calculation = xlCalculationManual
        .ScreenUpdating = False
        .EnableEvents = False
    End With

    For Each cell In CaseRange.Cells
        cell.Value = LCase(cell.Value)
    Next cell

    With Application
        .ScreenUpdating = True
        .EnableEvents = True
        .Calculation = CalcMode
    End With
End Sub


Sub ProperMacro()
    Dim CaseRange As Range
    Dim CalcMode As Long
    Dim cell As Range

    On Error Resume Next
    Set CaseRange = Intersect(Selection, _
        Selection.Cells.SpecialCells(xlCellTypeConstants, xlTextValues))
    On Error GoTo 0
    If CaseRange Is Nothing Then Exit Sub

    With Application
        CalcMode = .Calculation
        .Calculation = xlCalculationManual
        .ScreenUpdating = False
        .EnableEvents = False
    End With

    For Each cell In CaseRange.Cells
        cell.Value = StrConv(cell.Value, vbProperCase)
    Next cell

    With Application
        .ScreenUpdating = True
        .EnableEvents = True
        .Calculation = CalcMode
    End With
End Sub
Copy the two event procedures below in the Thisworkbook module of your workbook This will automatically add the controls to the Cell menu when you open or activate the workbook and delete the controls when you close or deactivate the workbook
Private Sub Workbook_Activate()
    Call AddToCellMenu
End Sub

Private Sub Workbook_Deactivate()
    Call DeleteFromCellMenu
End Sub
Then save, close and reopen the workbook to see the changes in the Cell menu.
Change the Activate event to run different macros to create different menus
In the VBA example on this page I showed you how to change the Cell menu and I used the Activate and Deactivate event of the workbook to call a macro to create and delete the menu controls.
You can change the Activate event like this to create different menus for different users, this way you can create a menu with different sets of custom controls for different users. If you use the same Tags in the code there is no need to call a different macro to delete the menu.
Private Sub Workbook_Activate()
    Dim sUserName As String
    sUserName = Application.UserName

    Select Case sUserName
    Case "Ron de Bruin": Call AddToCellMenu
    'Case "Dave Thomson": Call AddToCellMenu2
    'Case Else: Call AddToCellMenu3
    End Select
End Sub
In the example above you will see no changes in the menu if you are not
Ron de Bruin. See the two commented lines that show you how to call a
different macro if another user opens the workbook.
Another example
is to check for the Excel language in the activate event so you can create
menu captions in the language of the user in the context menu. In this case
if a Dutch or German user opens the workbook no menu will be created because
I commented out the two lines that call the macros you could make for these
two languages. For all other languages in this example the macro
AddToCellMenu is called and it creates a menu with English captions
Private Sub Workbook_Activate()
    Dim LangID As Long
    LangID = Application.International(xlCountryCode)

    Select Case LangID
    Case 31: 'Call AddToCellMenuInDutch
    Case 49: 'Call AddToCellMenuinGerman
    Case Else: Call AddToCellMenu
    End Select
End Sub
For a list of country codes see
http://support.microsoft.com/kb/213833/en-us
How do I find the name of the contextmenu that I want to change ?
The example macro below will add button on the bottom of each contextmenu
with the menu name.
You will notice that you will not see a name on each
context menu when you run it in Excel 2007-2013.
For example, you will
not see it when you right click on a shape or Picture in Excel 2007-2010.
So it not seems to be possible to change these menus in Excel 2007-2010 with
VBA.
Sub Add_Name_To_Contextmenus()
    Dim Cbar As CommandBar
    For Each Cbar In Application.CommandBars
        With Cbar
            If .Type = msoBarTypePopup Then
                On Error Resume Next
                With .Controls.Add(Type:=msoControlButton)
                    .Caption = "Name for VBA = " & Cbar.Name
                    .Tag = "NameButtonInContextMenu"
                End With
                On Error GoTo 0
            End If
        End With
    Next
End Sub


Sub Delete_Name_From_Contextmenus()
    Dim Cbar As CommandBar
    Dim ctrl As CommandBarControl

    For Each Cbar In Application.CommandBars
        With Cbar
            If .Type = msoBarTypePopup Then
                For Each ctrl In .Controls
                    If ctrl.Tag = "NameButtonInContextMenu" Then
                        ctrl.Delete
                    End If
                Next ctrl
            End If
        End With
    Next
End Sub
How do I find the control ID's or FaceID's :
Download Excel file with all
FaceID's from my site, you can use this file in Excel 97-2013
Find
the ID's and FaceId's see this page from Ole P. Erlandsen,
http://erlandsendata.no/?p=2694