 Back to jkp-ads.com |
Ron de Bruin
|
|
|
Back to jkp-ads.com |
Ron de Bruin
|
|
Ron de Bruin decided to remove all Windows Excel content from his website for personal reasons. If you want to know why, head over to rondebruin.nl.
Luckily, Ron was kind enough to allow me to publish all of his Excel content here.
Most of these pages are slightly outdated and may contain links that don 't work. Please inform me if you find such an error and I'll try to fix it.
Kind regards
Jan Karel Pieterse
The most common Context Menu that most people know and use is the Cell
menu.
This is the menu that you see when you right click on a worksheet
cell or selection.
The screenshot below is from the Excel 2010 Cell
menu.
Note: On the bottom of the menu you also see the
name of the idMso of this
menu added by the Microsoft add-in discussed
later in this article.
The only way to change this menu up to Excel 2007 is to use VBA code, but
in Win Excel 2010 and higher you can also change a context menu with RibbonX.
Note : In Mac Office 2016 and higher it is not possible anymore to change this
menu with VBA code, RibbonX is the only way to do it in the Mac 2016
and higher versions. RibbonX is not working in Mac Office 2011, you need VBA code in
this version.
The advantage of RibbonX in Excel 2010-2016 is that you can add controls
that are not possible to add with VBA, the following lists the controls
allowed in context menus.
control
button
checkBox
dynamicMenu
gallery
menu
menuSeparator
splitButton
toggleButton
But this will only work in Excel 2010 and
higher, so
if not all your users use Excel 2010 or higher it is better to use VBA code
to change your context menu so it works in every Excel version. See
this page for VBA code examples that are
working in almost every Excel version(not in Mac Office 2016 and higher).
Customizing Context Menus with VBA in every Excel version
If you want to insert RibbonX in a workbook to change the context menus, then I suggest you download and install the free Custom UI Editor on a Windows machine to make this a lot easier : http://openxmldeveloper.org/blog/b/openxmldeveloper/archive/2006/05/26/customuieditor.aspx
Note: I suggest that Mac developers develop on a Windows machine so they can use the Custom UI Editor. Be aware that imageMso is not working in Mac Office 2016 and higher
Important : Mac Excel 2016 must be version 15.17 or higher, before that RibbonX is not working in Mac Excel 2016.
Note: It is not possible to insert RibbonX into Excel 97-2003(xls) files.
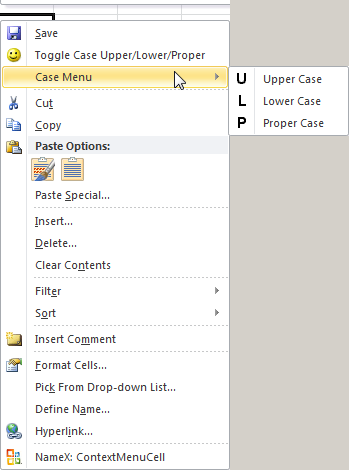
This example will add a custom button, built-in button (Save) and a Custom menu on top of the Cell menu.
Open a new workbook and save it at as a Macro Enabled Workbook (xlsm) and close the workbook. Open the file in the Custom UI Editor and Insert an Office 2010 Custom UI Part. Add the RibbonX below in the Office 2010 Custom UI Part of the workbook and save it. Close the Custom UI Editor
<customUI xmlns="http://schemas.microsoft.com/office/2009/07/customui">
   <contextMenus>
      <contextMenu idMso="ContextMenuCell">

         <button idMso="FileSave" insertBeforeMso="Cut" />

         <button id="MyButton" label="Toggle Case Upper/Lower/Proper"
 		insertBeforeMso="Cut"
		onAction="ToggleCaseMacro"
		imageMso="HappyFace"/>

         <menu id="MySubMenu" label="Case Menu" insertBeforeMso="Cut"  >
            <button id="Menu1Button1" label="Upper Case"
			imageMso="U" onAction="UpperMacro"/>
            <button id="Menu1Button2" label="Lower Case"
			imageMso="L" onAction="LowerMacro"/>
            <button id="Menu1Button3" label="Proper Case"
			imageMso="P" onAction="ProperMacro"/>
         </menu>

        <menuSeparator id="MySeparator" insertBeforeMso="Cut" />

      </contextMenu>
   </contextMenus>
</customUI>
Open the workbook in Excel and copy the four macros below into a Standard module of your workbook and save the file. Now right click on a cell and if you followed the steps correctly you will see that the Cell menu is changed. If you just started with VBA see this page:
Where do I paste the code that I find on the internet
Sub ToggleCaseMacro(control As IRibbonControl)
    Dim CaseRange As Range
    Dim CalcMode As Long
    Dim cell As Range

    On Error Resume Next
    Set CaseRange = Intersect(Selection, _
        Selection.Cells.SpecialCells(xlCellTypeConstants, xlTextValues))
    If CaseRange Is Nothing Then Exit Sub

    With Application
        CalcMode = .Calculation
        .Calculation = xlCalculationManual
        .ScreenUpdating = False
        .EnableEvents = False
    End With

    For Each cell In CaseRange
        Select Case cell.Value
        Case UCase(cell.Value): cell.Value = LCase(cell.Value)
        Case LCase(cell.Value): cell.Value = StrConv(cell.Value, vbProperCase)
        Case Else: cell.Value = UCase(cell.Value)
        End Select
    Next cell

    With Application
        .ScreenUpdating = True
        .EnableEvents = True
        .Calculation = CalcMode
    End With
End Sub


Sub UpperMacro(control As IRibbonControl)
    Dim CaseRange As Range
    Dim CalcMode As Long
    Dim cell As Range

    On Error Resume Next
    Set CaseRange = Intersect(Selection, _
        Selection.Cells.SpecialCells(xlCellTypeConstants, xlTextValues))
    If CaseRange Is Nothing Then Exit Sub

    With Application
        CalcMode = .Calculation
        .Calculation = xlCalculationManual
        .ScreenUpdating = False
        .EnableEvents = False
    End With

    For Each cell In CaseRange
        cell.Value = UCase(cell.Value)
    Next cell

    With Application
        .ScreenUpdating = True
        .EnableEvents = True
        .Calculation = CalcMode
    End With
End Sub


Sub LowerMacro(control As IRibbonControl)
    Dim CaseRange As Range
    Dim CalcMode As Long
    Dim cell As Range

    On Error Resume Next
    Set CaseRange = Intersect(Selection, _
        Selection.Cells.SpecialCells(xlCellTypeConstants, xlTextValues))
    If CaseRange Is Nothing Then Exit Sub

    With Application
        CalcMode = .Calculation
        .Calculation = xlCalculationManual
        .ScreenUpdating = False
        .EnableEvents = False
    End With

    For Each cell In CaseRange
        cell.Value = LCase(cell.Value)
    Next cell

    With Application
        .ScreenUpdating = True
        .EnableEvents = True
        .Calculation = CalcMode
    End With
End Sub


Sub ProperMacro(control As IRibbonControl)
    Dim CaseRange As Range
    Dim CalcMode As Long
    Dim cell As Range

    On Error Resume Next
    Set CaseRange = Intersect(Selection, _
        Selection.Cells.SpecialCells(xlCellTypeConstants, xlTextValues))
    If CaseRange Is Nothing Then Exit Sub

    With Application
        CalcMode = .Calculation
        .Calculation = xlCalculationManual
        .ScreenUpdating = False
        .EnableEvents = False
    End With

    For Each cell In CaseRange
        cell.Value = StrConv(cell.Value, vbProperCase)
    Next cell

    With Application
        .ScreenUpdating = True
        .EnableEvents = True
        .Calculation = CalcMode
    End With
End Sub
Bug: When you close the workbook every control you add
is removed from the Cell menu, but if you select another workbook the
built-in Save button that we added to the Cell menu is not removed.
This
seems to be a problem when you add built-in controls to a context menu.
If this is a problem for you you can insert a custom button instead that
calls a macro that executes the built-in Save control in this example as a
workaround.
Replace this line in the RibbonX that added the Built-in
control
<button idMso="FileSave"
insertBeforeMso="Cut" />
with this
<button
id="DuplicateBuiltInButton1" label="Save" insertBeforeMso="Cut"
onAction="BuiltInSaveCommand" imageMso="FileSave"/>
The macro for the onAction looks like this
Sub BuiltInSaveCommand(control As IRibbonControl)
    CommandBars.ExecuteMso "FileSave"
End Sub
For this example we can also use
ActiveWorkbook.Save
But with ExecuteMso you can execute every
built-in control on the Ribbon or context Menu.
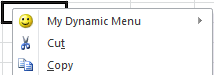
Dynamic menus point to callback procedures that create the menus at
runtime. The dynamicMenu control includes the getContent attribute that
points to a GetContent callback procedure.
This is the RibbonX in
custumUI14.xml that create a dynamic menu in the Cell context menu.
<customUI xmlns="http://schemas.microsoft.com/office/2009/07/customui">
   <contextMenus>
      <contextMenu idMso="ContextMenuCell">
         <dynamicMenu id="MyDynamicMenu"
		label= "My Dynamic Menu" imageMso="HappyFace"
		getContent="GetContent" insertBeforeMso="Cut"/>
      </contextMenu>
   </contextMenus>
</customUI>
For example, the following VBA code builds a dynamic menu at runtime with two buttons, which means that it is not created until the menu control on the context menu is clicked.
Sub GetContent(control As IRibbonControl, ByRef returnedVal)
    Dim xml As String

    xml = "<menu xmlns=""http://schemas.microsoft.com/office/2009/07/customui"">" & _
          "<button id=""but1"" imageMso=""Help"" label=""Help"" onAction=""HelpMacro""/>" & _
          "<button id=""but2"" imageMso=""FindDialog"" label=""Find"" onAction=""FindMacro""/>" & _
          "</menu>"

    returnedVal = xml
End Sub

Sub HelpMacro(control As IRibbonControl)
    MsgBox "Help macro"
End Sub

Sub FindMacro(control As IRibbonControl)
    MsgBox "Find macro"
End Sub
You can download three example workbooks here that add a dynamic menu to
the cell menu based on the username, language of Excel or the value of the
active cell (Formula, Empty, Numeric or Text)
You can find all the
information about the example in the relevant workbook.
Note:
Remember that the RibbonX examples only work in Excel 2010-2016
Download Dynamic menu Example files
ContextMenus Add-In for Office 2010 : This Com add-in from Microsoft add the idMso name of the ContextMenu on the bottom of every Context menu(Right click menu's). This is a very easy way for developers to find the idMso of the menu so they can use it in the RibbonX. Note: Only In 2010-2016 you can change the ContextMenu's with RibbonX. The add-in also seems to work OK in 2013-2016. Download Microsoft ContextMenusaddin