 Back to jkp-ads.com |
Ron de Bruin
|
|
 Back to jkp-ads.com |
Ron de Bruin
|
|
Ron de Bruin decided to remove all Windows Excel content from his website for personal reasons. If you want to know why, head over to rondebruin.nl.
Luckily, Ron was kind enough to allow me to publish all of his Excel content here.
Most of these pages are slightly outdated and may contain links that don 't work. Please inform me if you find such an error and I'll try to fix it.
Kind regards
Jan Karel Pieterse
On this page I show you how to add built-in controls to the QAT, you will notice that there are controls that have no image and will show a green circle when you add them to the QAT as you see in the screenshot, no problem if it is one but a few of them is not what we want.
![]()
If you select "Macros" In the “Choose commands from” dropdown and add a
macro button to the QAT you are able to use the Modify button to choose
another image but you do not have this option for built-in buttons in the
User Interface.
Excel 2007 saves your QAT setup in a file named
"Excel.qat" and from Excel 2010 it save it in the Excel.officeUI
file, in Win XP you will find it here :
C:\Documents and Settings\<username>\Local Settings\Application
Data\Microsoft\OFFICE\
In Vista and in Windows 7 you
can find it here :
C:\Users\<username>\AppData\Local\Microsoft\Office\
Note: This qat or officeUI file will not exist if your QAT is not
customized.
Editing the qat or officeUI file to change images is no good option so I will not
show you how to do this on this page.
Reason:The Excel "Customize
the QAT" feature does not preserve manual changes made to the qat or
officeUI file. So, if you subsequently use Excel to reset the QAT or to add or remove
commands to/from the QAT, the imageMso attributes will disappear.
The only good option for all workbooks is this:
Create a workbook named "OneWorkbookQAT.xlsm" and after you customize the
QAT for this workbook save/close "OneWorkbookQAT.xlsm". Note: In the "Customize Quick Access Toolbar" dropdown
choose "For OneWorkbookQAT.xlsm" when you add the controls that you
want in the QAT. Excel 2007-2016 files are really Zip files so we can change
the extension to .zip and open it in a third party zip program or use the
default Windows Zip program.
Important: I suggest
that you make a backup copy of the original file just in case you break
something.
Change the extension of “OneWorkbookQAT.xlsm” to
.zip now and Use the default Windows Zip program to open the
zip file. You can also use another third party Zip program, for example the
free 7-Zip.
Why ? : Much easier, because you not have to change the
extension and can edit the file in the zip.
http://www.7-zip.org/
After you
install 7-Zip you can do this.
1: Right click on
“OneWorkbookQAT.xlsm”
2: Choose 7-Zip > Open archive
3: Right click on the file named “customUI.xml” in the
“userCustomization” folder and choose "Edit"
Or select
the file and press F4
4: Edit the file and save and
close the “customUI.xml“ file
5: Say YES to update the
archive
But in the example below I use the default Windows Zip
program.
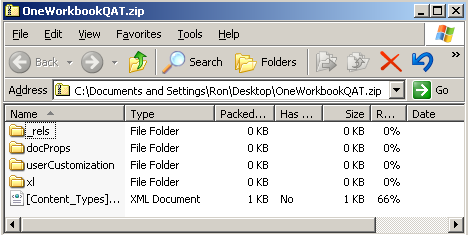
After you change the extension to zip of the Excel file and open
the zip file you see this.

It will save the QAT setup in the "userCustomization" folder in a file
named "customUI.xml”
Note: this folder will not exist if
you have not customized the QAT for this workbook.
Drag and drop this
file out of the zip file on your desktop and open it in Notepad
or
another xml editor and you see this line for every control:
<mso:control idQ="mso:PageBreakInsertExcel" visible="true"/>
You can add the image with imageMso in this line
<mso:control idQ="mso:PageBreakInsertExcel" imageMso="M" visible="true"/>
Then save and close the file and drag and drop it back into the zip file
and say YES to replace the file. Now close the zip file and change the
extension back to xlsm.
If you open the workbook you see that the
green circle is changed to an M now.
![]()
Note: You can only use built-in images, visit this page
to find the names of all the imageMso names : Ribbon Examples files and Tips
Save "OneWorkbookQAT.xlsm" now as a Excel Add-in (name it MyQAT.xlam for
example). This way you will not have the problem of your images disappearing
when you Add, Remove or Reset your QAT.
Close and reopen Excel and Use the shortcut Alt ti
or click the Microsoft Office button(2007) or File(2010-2016), click Excel
options(2007) or options(2010-2016), click the Add-Ins tab. In the Manage
drop-down, click Excel Add-ins, and click Go.
Use "Browse" to select
the add-in and then click on OK.
Verify MyQAT is
checked in the add-in list and then click OK.
Now every time you
start Excel it will load this add-in with your custom QAT.
Note: This is the first version of the add-in,
suggestions and bugs are welcome.
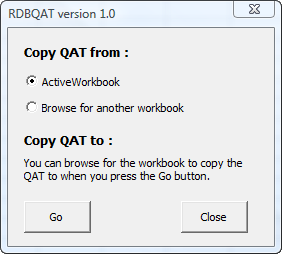
If you have made a few different
customized QAT's in your workbooks this add-in is maybe useful to copy a QAT
from one workbook to another. There is a button on the Add-Ins tab to open
the userform.
Download version 1.0
of the RDBQAT add-in
