 Back to jkp-ads.com |
Ron de Bruin
|
|
 Back to jkp-ads.com |
Ron de Bruin
|
|
Ron de Bruin decided to remove all Windows Excel content from his website for personal reasons. If you want to know why, head over to rondebruin.nl.
Luckily, Ron was kind enough to allow me to publish all of his Excel content here.
Most of these pages are slightly outdated and may contain links that don 't work. Please inform me if you find such an error and I'll try to fix it.
Kind regards
Jan Karel Pieterse
Many Excel 2007-2016 commands do not appear anywhere in the Ribbon, including some that used to be on the menus in Excel 2003. These commands still exist but you have to do something to make them available.
Name in the "Commands Not in the Ribbon" list :
Send to Mail Recipient
Camera
Add-ins
Select Visible Cells
Select Current Region
Form
Speak Cells by Columns
Speak Cells by
Rows
Speak Cells on Enter
Speak Cells
Speak Cells - Stop Speaking
Cells
Print Table
There are three ways you can make these commands and many others available.
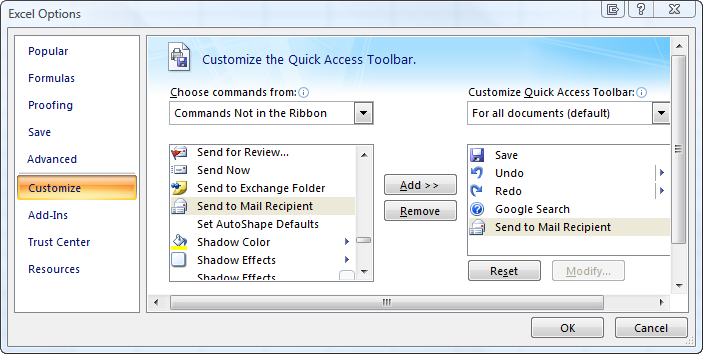
You can add useful commands to your QAT like this:
Note: the screenshots are from Excel 2007 but are almost
the same in 2010-2016.
Right click on the QAT and choose Customize Quick
Access Toolbar.

In the "Choose commands from" dropdown choose "Commands Not in the
Ribbon".
Then select the command you want in this long list and press
"Add"

Note: In the "Customize Quick Access Toolbar" dropdown
choose "For <workbook name>"
if you want to add the commands only to the
QAT for this workbook.
Read this article on the Microsoft site :
http://office.microsoft.com/en-us/excel-help/customize-the-ribbon-HA010355697.aspx
If you want to add missing commands to your own custom Ribbon tab in
Excel 2007-2016 you
must know the RibbonX name for the command that you want to add to the Ribbon
tab.
The idMso of the command you can find like this, point to the
command in the "Commands Not in the Ribbon" list with your mouse and you see
this.

Now we download a file in the section "Find the Control, Group and Tab names" on this webpage
We search for this idMso
SendCopySendToMailRecipient in the file you just download.
You
will find the Type of the command (button, toggleButton or ?) on the same
row in this file.
Now we have enough information to create this line
to add the command.
<toggleButton
idMso="SendCopySendToMailRecipient" size="normal"/>
The RibbonX below will create a new tab
on the Ribbon with a few example commands. You can save the workbook with
the RibbonX below as a add-in if you want to use the commands in all your
workbooks.
Note: If you not know how to add RibbonX
to your workbook check out my Ribbon start page.

<customUI xmlns="http://schemas.microsoft.com/office/2006/01/customui">
  <ribbon>
    <tabs>

      <tab id="CustomTab" label="Not in the Ribbon Tab" insertAfterMso="TabHome">

        <group id="YourCustomGroup1" label="Div Commands">
	  <toggleButton idMso="SendCopySendToMailRecipient" size="normal"/>
          <button idMso="Camera" size="normal"/>
	  <button idMso="AddInManager" size="normal"/>
          <button idMso="TableSelectVisibleCells" size="normal"/>
          <button idMso="SelectCurrentRegion" size="normal"/>
          <button idMso="DataFormExcel" size="normal"/>
        </group>

        <group id="YourCustomGroup2" label="Speak Commands">
          <toggleButton idMso="SpeakByColumns" size="normal"/>
          <toggleButton idMso="SpeakByRows" size="normal"/>
          <toggleButton idMso="SpeakOnEnter" size="normal"/>
          <button idMso="SpeakCells" size="large"/>
          <button idMso="SpeakStop" size="large"/>
        </group>

        <group id="YourCustomGroup3" label="Print">
          <button idMso="PrintListRange" size="large"/>
        </group>

      </tab>

    </tabs>
  </ribbon>
</customUI>