 Back to jkp-ads.com |
Ron de Bruin
|
|
 Back to jkp-ads.com |
Ron de Bruin
|
|
Ron de Bruin decided to remove all Windows Excel content from his website for personal reasons. If you want to know why, head over to rondebruin.nl.
Luckily, Ron was kind enough to allow me to publish all of his Excel content here.
Most of these pages are slightly outdated and may contain links that don 't work. Please inform me if you find such an error and I'll try to fix it.
Kind regards
Jan Karel Pieterse
If you want to use your favorite macros in all your workbooks then you can copy the macros in your Personal.xlsb. See this page for info: How do I create and use a PERSONAL file for my VBA code
Create your own tab on the Ribbon manual(2010-2016) or with RibbonX(2007-2016), see this page Change the Ribbon in Excel 2007-2016, Note: Only in 2010-2016 you can do this in the userinterface.
NEW : I also create another add-in in Nov-2015 that use a Dynamic menu control in the Ribbon and also use a menu Table to create your menu like the example below. Check it out and see what you like more: Dynamic Menu for your favorite macros in Excel 2007-2016
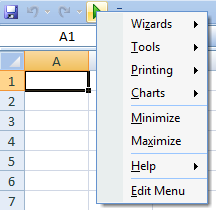
In the add-in below I add a button to the Quick Access Toolbar (QAT) that
opens a popup menu.
I changed John Walkenbach‘s superb menu maker
example for 97-2003 to create the PopUp menu.Very easy to add and edit
menu items with this technique, this is John's page :
http://www.j-walk.com/ss/excel/tips/tip53.htm
1) Download the zip file with the add-in
My Add-in.xlam (9-Dec-2014)
2)
Unzip/Copy the file to a folder on your system (Use a folder that you backup
sometimes).
3) Use the shortcut Alt ti
or click the Microsoft Office button(2007) or File(2010-2016), click Excel
options(2007) or options(2010-2016), click the Add-Ins tab. In the Manage
drop-down, click Excel Add-ins, and click Go.
Use "Browse" to select
the add-in and then click on OK.
Verify My Add-in is
checked in the add-in list and then click OK.
4) If we click on the green arrow in the QAT now the menu
will PopUp.
Note: It is possible that the green arrow is not working the first time after you install the add-in, close/reopen Excel will fix it this problem.

We click on the green arrow button in the QAT and choose "Edit Menu" in
the menu.
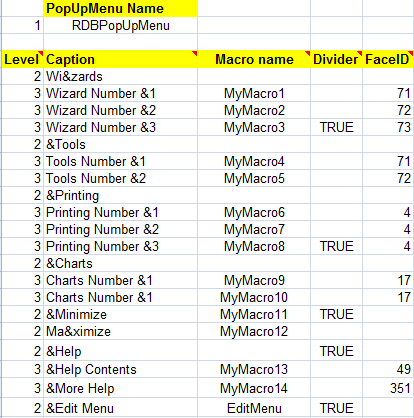
You will now see the worksheet in the add-in with the menu
table you see below.

Read the following information carefully:
Level: The "level" of the particular item. Valid values are
2 and 3.
Level 2 is for a menu item and 3 is for a submenu item.
Caption: The text that appears in the menu, menu item, or
submenu.
Use an ampersand (&) to specify a character that will be
underlined.
Macro name: For level 2 or level 3
items, this will be the macro that is executed when the item is selected. If
a level 2 item has one or more level 3 items, the level 2 item may not have
a macro associated with it. If you use Alt F11 to go to the VBA editor you
can add or change your macros in the MacroModule.
Divider:
True if a "divider" should be placed before the menu item or submenu item.
FaceID: Optional, code number that represents the
built-in graphic images that is displayed
You can edit the
information in the table to make your own menu. You can click on the
“Refresh Menu” button on the worksheet to see if your changes are correct.
When It is OK click on the "Save the Add-in" button on the worksheet to save
the add-in.
Tip: You can download
showfaceids.xls from my site to find all FaceID numbers.
Download Example workbook :Read the information in the workbook
If you want to save this workbook as a add-in then you must change this in the code : Remove or comment the two black code lines in this macro in the PopUpMacrowb module.
Sub WBDisplayPopUp()
    If ActiveWorkbook.Name = ThisWorkbook.Name Then
        On Error Resume Next
        Application.CommandBars(ThisWorkbook.Sheets("MenuSheet").Range("B2").Value).ShowPopup
        On Error GoTo 0
    End If
End Sub