 Back to jkp-ads.com |
Ron de Bruin
|
|
|
Back to jkp-ads.com |
Ron de Bruin
|
|
Ron de Bruin decided to remove all Windows Excel content from his website for personal reasons. If you want to know why, head over to rondebruin.nl.
Luckily, Ron was kind enough to allow me to publish all of his Excel content here.
Most of these pages are slightly outdated and may contain links that don 't work. Please inform me if you find such an error and I'll try to fix it.
Kind regards
Jan Karel Pieterse
Note : If you are a Mac user follow the steps on this page : Change the Ribbon in Mac Excel 2016 and up
If you want to insert RibbonX into a Excel 2007 and up workbook to change the Ribbon, then I suggest you download and use the free Office RibbonX Editor created by Fernando Andreu to make this a lot easier : https://github.com/fernandreu/office-ribbonx-editor/releases/latest , download OfficeRibbonXEditor-NETFramework.zip and after you unzip it open the OfficeRibbonXEditor.exe to use it.
Before Fernando Andreu released this tool we used a tool named Custom UI Editor created by Trang Luu, you can download it here if you want to test this very old tool, but I suggest that you use the new tool that Fernando Andreu created that is up to date.
The Office RibbonX Editor gives you an option to insert a customUI.xml
file in your Excel workbook that loads when you open the file in Excel 2007and
up
and/or a customUI14.xml file that only loads when you open
the Excel workbook in Excel 2010 and up. What, files that are inside a Excel
file?.
Excel 2007 and up files are really zip files so if you change the
extension to zip and open the file in your zip program you see that there
are a few folders and a file inside the zip. Thanks to the Office RibbonX Editor we not have to do
all this to add or edit the customUI.xml or CustomUI14.xml file inside your
Excel file.
Note: You will notice that Excel versions 2010 and up use the same xml file named customUI14.xml
When you not work with things that are added in Excel 2010 and up (like Backstage View for example), then you can only use the Office 2007 Custom UI Part option to add your RibbonX, it will load the RibbonX from this file when you open the Excel file in Excel 2007 and up. But if you open the Excel file in Excel 2010 and up and there is also a customUI14.xml file it will load only this file.
Note: It is not possible to insert RibbonX into Excel 97-2003(xls) files.

Open : Open the Excel file that you want to
edit (Be sure it is not open in Excel)
Save : Save the
RibbonX in the file that you have open in the UI editor
(not possible to save when the file is open in Excel)
Insert
Icons : Insert your own icons in the file (icons will be saved in
the file)
Validate : Validate your RibbonX so you are
sure that there are no typos
Generate Callbacks : This
will create macros(callbacks) for each onAction you have in
the RibbonX.
Select all callbacks and copy them in a normal module in your workbook.
Reload on Save : If you have the file open in Excel, to
ensure you do not delete changes made in the externally open Excel file, use
the button to reload the documents right before they are to be saved.
When you open a Excel file in the Office RibbonX Editor you can right click
on the file name and choose :
Office 2007 Custom UI Part Or use Office
2010+ Custom UI Part
Or you can use the Insert menu to choose one of the
two options.
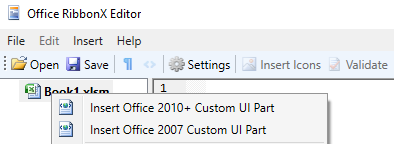
It creates the customUI14.xml file if you choose Office 2010+ Custom UI Part and the customUI.xml file if you choose Office 2007 Custom UI Part. After you choose one option or both, you can enter or paste your RibbonX in the correct part.
In this example we add RibbonX to the file that create a button on the
Home tab when you open your file in Excel 2007 and up. Because we not use
something new for 2010 and up we only have to add the RibbonX to the
customUI.xml file ("Office 2007 Custom UI Part") .
1:
Open a new workbook and save it as Book1.xlsm (Excel Macro-Enabled workbook)
2: Close the workbook
3: Open
Book1.xlsm in the Office RibbonX Editor
4: Right click on the
File name in the Office RibbonX Editor or use the Insert menu
5:
Choose "Office 2007 Custom UI Part" to create the customUI.xml file
6: Paste the RibbonX below in the right window
Note: If there is no customUI14.xml file it will load the
customUI.xml also in Excel 2010 and up.
<customUI xmlns="http://schemas.microsoft.com/office/2006/01/customui">
  <ribbon>
    <tabs>

      <tab idMso="TabHome" >
        <group id="customGroup1" label="My Group" insertAfterMso="GroupEditingExcel">

          <button id="customButton1" label="Click Me" size="large"
		onAction="Macro1" imageMso="HappyFace" />
        </group>
      </tab>

    </tabs>
  </ribbon>
</customUI>
7: Save your changes in the Office RibbonX Editor (click on
the Save button)
8: Close the Editor
9:
Open the File in Excel
10: Alt F11
11:
Insert Module
12: Copy the macro below in the Module
Sub Macro1(control As IRibbonControl)
    MsgBox "Hi There"
End Sub
13: Click on the Save button in the VBA editor
14: use Alt q to close the VBA editor
15:
Test the workbook in 2007 and/or in 2010 and up

Note: For example workbooks visit this page : Ribbon Examples files and Tips
For an example of creating two version specific ribbons for either Excel 2007 or 2010 or (higher) in the same xlsm file, visit: Load different RibbonX when opening file in Excel 2007 or 2010 and up
Visit this page for tips and more examples : Ribbon Examples files and Tips