 Back to jkp-ads.com |
Ron de Bruin
|
|
|
Back to jkp-ads.com |
Ron de Bruin
|
|
Ron de Bruin decided to remove all Windows Excel content from his website for personal reasons. If you want to know why, head over to rondebruin.nl.
Luckily, Ron was kind enough to allow me to publish all of his Excel content here.
Most of these pages are slightly outdated and may contain links that don 't work. Please inform me if you find such an error and I'll try to fix it.
Kind regards
Jan Karel Pieterse
It is not possible to add to or remove controls from built-in groups in
the Ribbon. For example, the Format Painter button from the Home tab's
Clipboard group cannot be removed from this group.
But there is a way
around this restriction. We can hide a built-in group and then duplicate it
with RibbonX. And then we can modify our duplicate group anyway we want.
Note: Read this page if you not know how to add RibbonX
to a workbook.
Load different RibbonX when opening
file in Excel 2007 or 2010 and up
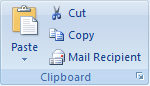
As an example of replacing a built in group and then customizing it, we
will hide the original "Clipboard" group on the Home tab and build a new one
without the Format Painter control. In addition we will add the Mail
Recipient control that Microsoft has hidden. The Mail Recipient button sends
a selection or worksheet to the body of an email. You can add a built-in
control like we do in this example or add a custom button that runs a macro.
On my Ribbon page you can find examples of how you
can add a custom button.
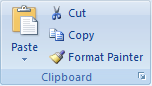
Screenshot from Excel’s built-in Clipboard
group in 2007 before we replace it with ours:
First we create a new workbook and save it with the name test.xlsx and we close this workbook in Excel. Then we open the file in the UI Editor and paste the RibbonX below in the Office 2007 Custom UI Part.
<customUI xmlns="http://schemas.microsoft.com/office/2006/01/customui">
<ribbon>
<tabs>

<!-- Set visible to false for the Clipboard group on the Home tab-->
<tab idMso="TabHome">
<group idMso="GroupClipboard" visible="false"/>
</tab>


<!-- Point to the Built-in tab to the ribbon -->
<tab idMso="TabHome">

<!-- Add Clipboard group -->
<group id="DupClipboard" label="Clipboard" insertBeforeMso="GroupClipboard" >
	<splitButton idMso="PasteMenu" size="large" />
	<button idMso="Cut"/>
	<button idMso="Copy"/>
	<control idMso="FormatPainter"/>

	<dialogBoxLauncher>
	<button  idMso="ShowClipboard" />
	</dialogBoxLauncher>
</group>

</tab>


</tabs>
</ribbon>
</customUI>
Then we copy this in the Office 2010 + Custom UI Part.
The RibbonX is not the same for 2007 and for 2010 and higher that's why we copy the part below in the 2010+ section.
Note: If there is no customUI14.xml file it will load the customUI.xml for 2007 also in Excel 2010 and up.
<customUI xmlns="http://schemas.microsoft.com/office/2009/07/customui">
<ribbon>
<tabs>

<!-- Set visible to false for the Clipboard group on the Home tab-->
<tab idMso="TabHome">
<group idMso="GroupClipboard" visible="false"/>
</tab>


<!-- Point to the Built-in tab to the ribbon -->
<tab idMso="TabHome">

<!-- Add Clipboard group -->
<group id="DupClipboard" label="Clipboard" insertBeforeMso="GroupClipboard" >
	<splitButton idMso="PasteMenu" size="large" />
	<button idMso="Cut"/>
	<splitButton idMso="CopySplitButton"/>
	<control idMso="FormatPainter"/>

	<dialogBoxLauncher>
	<button  idMso="ShowClipboard" />
	</dialogBoxLauncher>
</group>

</tab>


</tabs>
</ribbon>
</customUI>
Now we click on the Save button in the Custom UI Editor and open the file test.xlsx in Excel. And if you have done it correctly you see no change because we hide the Clipboard group and duplicate it. We close test.xlsx in Excel now and go back to the Custom UI Editor. It is very Important to close the file in Excel when you work with the file in the Custom UI editor.
The next step is to replace the line that add the Format Painter control
in the 2007 and 2010+ UI Part:
<control idMso="FormatPainter"/>
With this line that add the Mail Recipient control:
<toggleButton idMso="SendCopySendToMailRecipient" />
Now we click on the Save button in the Custom UI Editor and close it. Then we open the file test.xlsx in Excel. And if you have done it correctly you see that the Format Painter control is replaced by the Mail Recipient control :
But how do you know the RibbonX to duplicate the groups in the Ribbon, in the downloads below you can find the RibbonX to hide the built-in groups and to duplicate them so you have full control to change them the way you want.
Download this file from the Microsoft site: Office 2010: Office Fluent User Interface Control Identifiers
Download this file from the Microsoft site: Office 2013: Office Fluent User Interface Control Identifiers
Download this file from the Microsoft site: Office 2016: Office Fluent User Interface Control Identifiers
See also github : https://github.com/OfficeDev/office-fluent-ui-command-identifiers
Excel 365 idMso's (9-July-2020), in the example files I duplicate every group in the Ribbon.
Note: Will add the Draw tab soon
Download Excel 365 example files