An MSForms (all VBA) treeview
Pages in this article
-
Features
-
How To Use
-
Examples
How to use
This page outlines the minimum steps needed to add this treeview
control to your own Excel or Word VBA project. For Access the
instructions are different, those can be found in the
Access download.
The container control
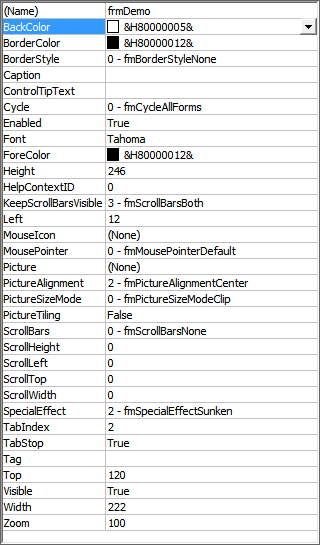
Open the designer window of your userform and add a frame. This is
where the treeview will be built. We recommend these properties (which
are of course optional):

Recommended properties for the container frame
Your userform would look like this:

The container frame on your userform
If you want images in your treeview, you'll have to add another frame
(we called it frmImageBox) and then add Image controls within that
frame. Set the Visible property of the frame to false to avoid it
showing up on your userform. Like so:

The images frame on your userform
If you want to add images, make sure you name the new image controls
properly, as it is the name of the imagecontrol you need to pass to the
cNode class to get that image displayed. An easy way to get the images
is to copy the entire frame with images from our userform to yours.
Class modules
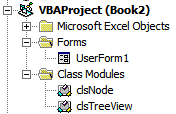
Copy the class modules clsNode and clsTreeView to your project (you
can simply drag them to your project). Your project (if you started with
an empty workbook) would look like this:

The project with class modules in place
So far, things have been simple. The next parts are a bit more
compex, but nothing too hard!
For the treeview to work, your userform needs some code, in
particular these elements are necessary:
- Some variable declarations that will enable you to address the
treeview and have your form handle events
- Initialisation code to:
- add nodes to the tree
- draw the treeview
That's it!
Variable declaration
Add this code to the declaration section of your userform:
'Add this to your form's declaration section
Private WithEvents
mcTree As clsTreeView
That's it! No more variables needed!
Of course the name of the variable mcTree is totally up to you.
If you need another (independent) treeview on your form, simply add
another frame to hold it and an additional variable in the forms
declaration section (of course you name it differently than the other
one) like the one shown here.
Initialisation
In the intialisation routine of your form, you need code that adds
nodes to the tree and when you're done adding nodes, you need to set
some properties of the treeview. Then you'll want the treeview to be
displayed.
Adding an instance of the treeview to your form
Adding the instance is easy:
'Instantiate a new instance of the treeview
class and set a module level variable to hold it:
Set mcTree =
New clsTreeView
Now tell the tree class instance which frame is its container:
With mcTree
'The VBA treeview needs a container Frame
control on the userform.
'Just draw a frame on your form where the
treeview should appear
'Make sure the frame has no border and no
caption
'Set it to show both scroll bars.
(Keepscrollbarsvisible to both)
'Set it to the special effect "Sunken"
'Note that node label formats such as
back/fore colors and font adopt
'the frame container's properties, so
change if/as required.
'(you can copy the frame named frmDemo
from this userform )
'Then pass this frame to the TreeControl
of the treeview class
Set .TreeControl = Me.frmDemo
'Title for message boxes:
.AppName = Me.AppName
Note that most of the code listed below is within
the With mcTree ... End With structure.
Setting initial look
You'll want control over the look and feel of your treeview, here is
some example code (this code comes immediately below the code sample
show above):
'Set some properties
.CheckBoxes =
True
.RootButton =
True
.LabelEdit = 0
'default is 0 can be edited (like LabelEditConstants
tvwAutomatic/tvwManual)
.Indentation = 20 * 0.75
'defaults to 11.25
.NodeHeight = 16 * 0.75
'defaults to 12
.ShowLines =
True
'If your form has icons in an iconframe
(called frmImageBox),
'you could use icons for the expand and collapse buttons:
Call
.ExpanderImage(Me.frmImageBox.Controls("Win7Minus").Picture,
Me.frmImageBox.Controls("Win7Plus1").Picture)
If your treeview needs to show images, add a frame control with Image
controls inside. Lets call it frmImageBox. This is how you tell the
class where the images are:
Set .Images = Me.frmImageBox
That is just about all the plumbing you need to get started.
Adding nodes
First of all, a couple of variables are needed to add nodes:
'The root of the tree
Dim cRoot As
clsNode
'A node
Dim cNode As
clsNode
'An extra variable should you need to remember a
certain node
Dim cExtraNode As
clsNode
Next we'll start by building the rootnode:
' add a Root node with main and expanded
icons and make it bold
Set cRoot = .AddRoot("Root", "Root
Node", "FolderClosed", "FolderOpen")
cRoot.Bold =
True
Note that the tree can have more than one rootnode, there is a
special RootNodes collection to which you automatically add new roots by
calling the AddRoot method.
As you can see, we assume there are two icons in the image frame
called FolderClosed and FolderOpen respectively.
Now we want to add children to the root. This is the code from our
demo form:
'Add branches with child nodes to the
root:
'Keys are optional but if using them they
must be unique,
'attempting to add a node with a duplicate
key will cause a runtime error.
'(below we will include unique keys with
all the nodes)
Set cNode = cRoot.AddChild("1", "1
A", "FLGNETH")
cNode.Bold =
True
'Add a 2nd branch to the root:
Set cNode = cRoot.AddChild("2", "2
B", "FLGSWED")
cNode.Bold =
True
'If you want to add more child branches to
a branch later on, use a variable to store the branch.
Set cExtraNode =
cNode.AddChild("2.1", "2.1 level 2", "NOTE03", "NOTE04") '
include an expanded icon
cExtraNode.Expanded =
False ' this node will
initially be collapsed,
' its child node controls will
be created when expanded
'To add a branches to a branch, make sure
you set a variable to its 'main' or parent branch when created
'Then use the Branch's AddChild method,
here to create multiple levels
Set cNode = cNode.AddChild("2.2",
"2.2 level 2", "NOTE03", "NOTE04") ' include
an expanded icon
Set cNode =
cNode.AddChild("2.2.1", "2.2.1 level 3", "OpenBook")
Set cNode =
cNode.AddChild("2.2.1.1", "2.2.1.1 level 4", "Scroll")
Set cNode =
cNode.AddChild("2.2.1.1.1 ", "2.2.1.1.1 level 5", "GreenTick")
'Now add another branch to the branch we
stored earlier
cExtraNode.AddChild "2.1.1", "2.1.1 level 3", "OpenBook"
'Add a 3rd branch to the root, with a
child node
Set cNode = cRoot.AddChild("3", "3
C", "FLGUK")
cNode.Bold =
True
cNode.AddChild "3.1", "3.1 level 2", "Scroll"
' and add a 4th branch to the root
Set cNode = cRoot.AddChild("4", "4
D", "FLGUSA02")
cNode.Bold =
True
cNode.Caption = "4 D +" & mlCntChildren
' add a bunch of child nodes to the 4th
branch
For i = 1 To
mlCntChildren ' 15
Set
cExtraNode = cNode.AddChild("4." & i, " 4.1 " & Right$("000" & i,
4), "Scroll")
' add some alternate row colour
formats
If
i Mod 2 Then
cExtraNode.BackColor = RGB(255, 255, 220)
' pale yellow
cExtraNode.ForeColor = RGB(180, 0, 0)
' dark red font
End
If
Next
Display the tree
Displaying the tree is as simple as calling one method:
'Fill the tree
.Refresh
Termination
When the form goes out of scope (i.e. out of memory) you need to
remove the treeview from memory:
Private Sub
UserForm_QueryClose(Cancel
As Integer,
CloseMode
As Integer)
'Make sure all objects are destroyed
If Not
mcTree Is Nothing
Then
mcTree.TerminateTree
End If
End Sub
Feedback
We've worked hard to create a reliable and performant treeview. If
you encounter bugs, please let us know so we can work on them. Better
yet: if you have fixed a bug you found, send us your updated code so we
can add the fixes you made.
In any case, comments (and compliments) are welcome!